版本 de7513aca41b7d14c16e564dc42b0208d80353b7
Changes from de7513aca41b7d14c16e564dc42b0208d80353b7 to current
---
title: Lab20: GNU Toolchain
toc: no
...
預期目標
-------
* 搭配`第二周<http://wiki.csie.ncku.edu.tw/embedded/2013-w2>`_課程進度
- 學習 GNU Toolchain 的使用
QEMU_STM32 + QEMU 操作
----------------------
- 假設 `Lab-19</embedded/Lab19>`_ 所使用 QEMU 的目錄已放在 workspace 目錄
.. code-block:: prettyprint
* 搭配[第二周](http://wiki.csie.ncku.edu.tw/embedded/2013-w2)課程進度
- 學習 Linux 工具和 GNU Toolchain 的使用
- 學期 Automation 技巧
- 學習 ARM semihosting 的使用
QEMU + GDB操作
----------------------------
- 假設 [Lab-19](/embedded/Lab19) 所使用 QEMU 的目錄已放在 workspace 目錄
```
cd workspace
file qemu_stm32
```
- 取得 GDB Automation
.. code-block:: prettyprint
```
git clone git://github.com/embedded2013/gdb-automation.git
git clone git@github.com:embedded2013/gdb-automation.git # 如果上一行失敗
cd gdb-automation
```
- 開啟一個終端機,作以下輸入
.. code-block:: prettyprint
```
make qemudbg
```
- 開啟另一個終端機,準備透過 gdb 來追蹤程式。下列 (gdb) 開頭的指令表示在 GDB 內部操作
- 使用 Ubuntu 64-bit 版本時,需要另外安裝 lib32ncurses5
- sudo apt-get install lib32ncurses5
.. code-block:: prettyprint
```
sudo apt-get install lib32ncurses5
cd gdb-automation
arm-none-eabi-gdb
(gdb) file main.elf
Reading symbols from gdb-automation/main.elf...done.
(gdb) b main
Breakpoint 1 at 0x2206: file main.c, line 8.
(gdb) target remote :3333
Remote debugging using :3333
Reset_Handler ()
at libraries/CMSIS/CM3/DeviceSupport/ST/STM32F10x/startup/gcc_ride7/startup_stm32f10x_md.s:67
67 movs r1, #0
(gdb) c
Continuing.
Breakpoint 1, main () at main.c:8
8 RCC_APB2PeriphClockCmd(RCC_APB2Periph_AFIO, ENABLE);
(gdb) list
3
4 int main(void)
5 {
6 int last_button_state, new_button_state;
7
8 RCC_APB2PeriphClockCmd(RCC_APB2Periph_AFIO, ENABLE);
9 RCC_APB2PeriphClockCmd(RCC_APB2Periph_GPIOC | RCC_APB2Periph_GPIOA, ENABLE);
10
11 /* Configure PC.12 as output push-pull (LED) */
12 GPIO_WriteBit(GPIOC,GPIO_Pin_12,Bit_SET);
(gdb) b 23
Breakpoint 2 at 0x2264: file main.c, line 23.
(gdb) c
Continuing.
Breakpoint 2, main () at main.c:23
23 new_button_state = GPIOA->IDR & 0x00000001;
(gdb) n
24 if(new_button_state ^ last_button_state) {
(gdb) p new_button_state
$1 = 0
(gdb) info breakpoints
Num Type Disp Enb Address What
1 breakpoint keep y 0x00002206 in main at main.c:8
breakpoint already hit 1 time
2 breakpoint keep y 0x00002264 in main at main.c:23
breakpoint already hit 1 time
(gdb) del 2
(gdb) watch GPIOC->ODR
Hardware watchpoint 3: GPIOC->ODR
(gdb) c
Continuing.
```
- 在 QEMU monitor 內作以下輸入,試圖模擬按鈕的動作
.. code-block:: prettyprint
```
sendkey b
```
- 隨後可發現 GDB 畫面出現變化:
.. code-block:: prettyprint
```
Hardware watchpoint 3: GPIOC->ODR
Old value = 4096
New value = 0
main () at main.c:29
29 last_button_state = new_button_state;
```
- 事實上 GPIOC 是個 macro,可透過 GDB 驗證
.. code-block:: prettyprint
```
(gdb) info macro GPIOC
Defined at libraries/CMSIS/CM3/DeviceSupport/ST/STM32F10x/stm32f10x.h:1410
included at Lab-2/demo/main.c:2
#define GPIOC ((GPIO_TypeDef *) GPIOC_BASE)
```
GDB Automation
----------------------------
- 撰寫特別的 GDB script,使得 QEMU 能自動在 UART 畫面印出 "Hello!" 字樣。main.c 檔案的行數應該越少越好,處理動作最好全權交給 GDB
- 在 Makefile 新增 'gdbauto' 的 target,自動進行 QEMU + GDB + UART 輸出
* 也就是預期執行 ``make gdbauto`` 之後,能呼叫 QEMU
- 執行 ``make gdbauto`` 之後,能自動呼叫 QEMU 並藉由 UART 顯示 'Hello!' 字串
參考作業 (A) 要求
------------------
* 原本的 GDB Automation 程式僅能將 "Hello!" 字樣輸出到 UART 裝置,是否能夠在 GDB session 中取得輸出的文字並比對?(自動測試需求)
- 提示:可在 GDB 使用 ``set logging on``
- 提示:可修改 QEMU 執行參數
* 進一步縮短 ``gdb.in`` 的檔案長度
ARM Semihost
------------
* 使用 ARM 所開發的目標系統 (target system),不一定會提供所有的輸入/輸出設備。因此 ARM 設計了 semihost 這種機制,讓運行 ARM debugger 的主機可以與目標系統進行 I/O 溝通,以利產品開發
- http://albert-oma.blogspot.tw/2012/04/semihosting.html
* Semihost 的實作是透過使用定義好的軟體中斷 (SVCs),使程式在執行過程中產生中斷。一旦目標系統上的程式呼叫到對應的指令 (semihosting call),便產生軟體中斷,接著 Debug Agent 就會負責處理此中斷,進行與主機的溝通
- http://infocenter.arm.com/help/index.jsp?topic=/com.arm.doc.dui0205g/Bgbjhiea.html
* FreeRTOS extensions: https://github.com/hugovincent/mbed-freertos
- lib/semifs.c
- mbed (mbed.org) target supports semihosted local filesystem, accessible via the mbed USB interface. Should also work with semihosting-compatible debuggers.
* QEMU ARM semihosting
- http://balau82.wordpress.com/2010/11/04/qemu-arm-semihosting/
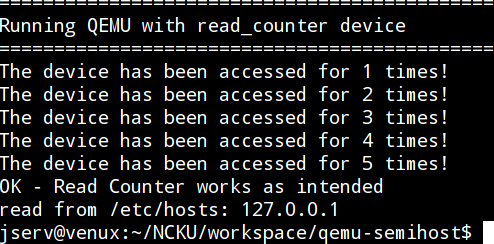
qemu-semihost 操作
---------------------------------
* cd ~/workspace
* git clone git://github.com/embedded2013/qemu-semihost.git
* git clone git@github.com:embedded2013/qemu-semihost.git # 如果上一行失敗
* cd qemu-semihost
* ./test.sh
參考執行畫面:
參考作業 (B) 要求
------------------
- 從 [rtenv](https://github.com/embedded2013/rtenv) 移植或參考其 pathserver, read, write 實作,使得 qemu-semihost 的 hello.c 得以從 Linux host 端讀取和寫入檔案
- 至少得讀取 host 端檔案,加入特定字串後,再寫回到 host 端
作業繳交方式
------------------
* 請更新作業提案到共筆網站: [Lab 20 / 作業共筆](https://embedded2013.hackpad.com/Lab20-GNU-Toolchain-zI6gzN3uv1c)
- 需要標注自己的 ID,可參考 [Lab 19 / 作業共筆](https://embedded2013.hackpad.com/Lab19-QEMU-Modeling-cabeJyAnAFe) 格式
* 請在 Oct 5, 2013 前,將符合作業提案的程式碼,提交到自行 fork 的 repository
- https://github.com/embedded2013/gdb-automation
- https://github.com/embedded2013/qemu-semihost
參考資訊
-------
- debugger 和 software emulator
* opencsl.openfoundry.org/Lab05_debugger.rst.html
* http://www.cis.nctu.edu.tw/~is92004/article/gdb.htm
- GDB 筆記
* http://loda.hala01.com/2012/04/gdb%E7%AD%86%E8%A8%98/
- 以 GDB 重新學習 C 語言程式設計
* http://www.slideshare.net/jserv/clang-usinggdb
- GDB Manual
* http://sourceware.org/gdb/current/onlinedocs/gdb/
* Commands, Remote Debugging, Extending GDB
