版本 2898fbbb832cba210a5151badf885b15f50d4553
Changes from 2898fbbb832cba210a5151badf885b15f50d4553 to 67c3c8d43f95742beffbcc79ee14625db41c48b0
---
title: RT-Thread
categories: embedded, arm, rtos, rt-thread, beaglebone, am335x
toc: no
...
協作者
---
* 2015 年春季
- [周曠宇](https://github.com/luckyjoou), [吳子晨](https://github.com/Eddy0402), [Adrian Huang](https://github.com/AdrianHuang), [吳念祖](https://github.com/nienzu), [吳義路](https://github.com/jackraken), [江冠霆](https://github.com/CKT-tw)
共筆
----
* 2015 年春季
- [Hackpad](https://rt-thread.hackpad.com/RT-Thread-on-Beaglebone-Black-i93C7gRxZuW)
目錄
---
* [AM335x ARM Cortex-A8 Boot Sequence](#AM335x ARM Cortex-A8 Boot Sequence)
* [VMM (Virtual Machine Module) and vbus ](#VMM (Virtual Machine Module) and vbus)
- [Introduction to VMM ](#Introduction to VMM)
- [Running VMM on QEMU (target machine: realview-pb-a8) ](#Running VMM on QEMU (target machine: realview-pb-a8))
- [Running VMM on BeagleBone Black ](#Running VMM on BeagleBone Black)
- [Introduction to vbus ](#Introduction to vbus)
* [記憶體管理](#記憶體管理)
- [MMU Configuration in RT-Thread](#MMU Configuration in RT-Thread)
- [Memory Pool (mempool.c)](#Memory Pool (mempool.c))
- [Heap](#Heap)
- [Slab Allocator](#Slab Allocator)
* [Device File Systestem](#Device File Systestem)
- [RTT的應用層接口實作](#RTT的應用層接口實作)
- [DFS框架的組成內容](#DFS框架的組成內容)
- [RTT文件系統初始化過程](#RTT文件系統初始化過程)
AM335x ARM Cortex-A8 Boot Sequence
--------------------------------------------
圖1 為AM335x開機流程,其包含ROM Code、MLO、U-Boot與OS Image,底下將說明ROM Code、MLO與U-Boot。
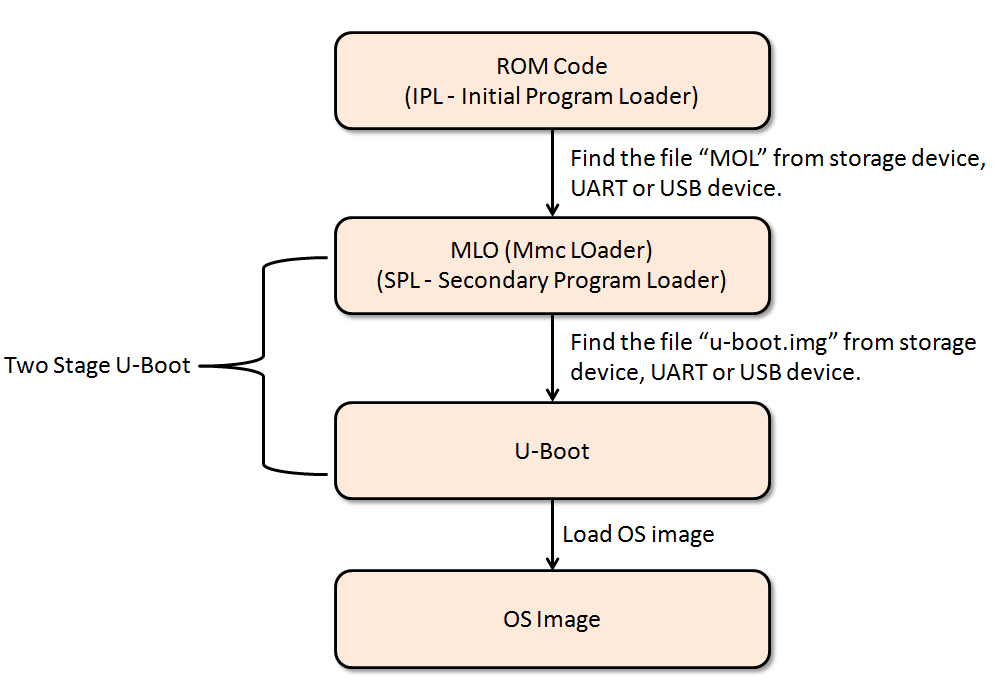
圖1 High-level Overview to AM335x Boot Sequence
ROM Code主要有幾項任務:
- Stack Setup
- Watchdog timer 1 configuration (set to three minutes)
- System clock configuration
- Search bootable devices (must be the FAT 12/16/32 partition) for a valid booting image (the image name must be MLO)
- Load the content of the file "MLO" from a bootable device to internal RAM (the 128KB on-chip memory)
- Execute the file "MLO" stored in internal RAM
圖2為ROM Code架構,由"Public ROM Code drivers"可知ROM code支援如下裝置:
- MMCSD (MultiMediaCard SD)
- NAND
- XIP (eXecute In Place)
- SPI
- USB UART
- EMAC (Ethernet Media Access Control)
也就是說,系統一上電,ROM Code會掃描上述裝置,以便找到Bootable device。由於ROM Code只支援FAT檔案系統格式,所以Bootable device一定要是FAT檔案系統 (FAT12/16/32檔案系統都可以)。
注意: 該架構的On-chip boot ROM大小為176 KB。
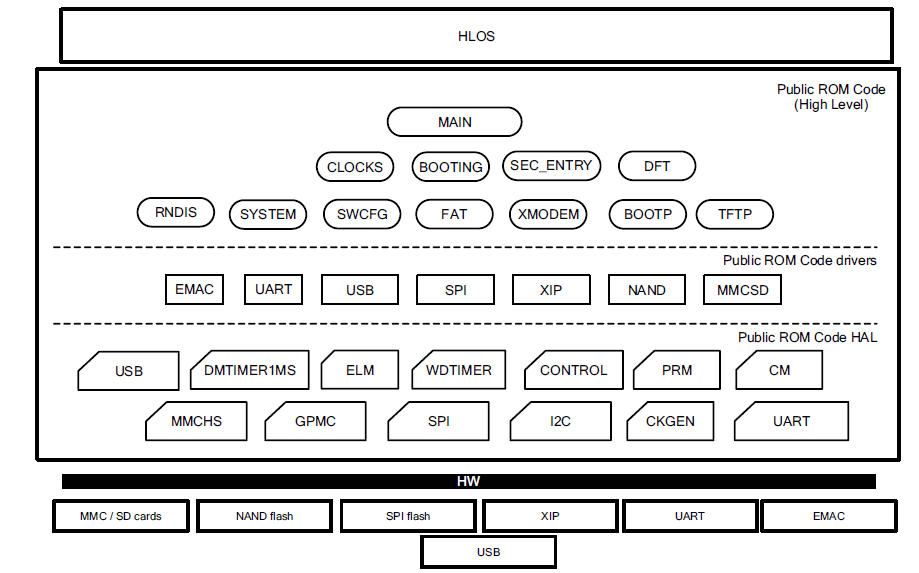
圖2 ROM Code Architecuture (page 4096 in AM335x TRM)
圖3為ROM Memory Map:
- ROM Exception Vectors (0x20000-0x2001F): 該區段定義Exception Handler的位址。譬如: 0x20000存放Reset Handler的位址,也就是板子一上電,第一個執行的地方,課程第七周有詳盡的說明,可參考此文件。詳盡的ROM Exception Vectors如表1所示。

表1 ROM Exception Vectors (page 4099 in AM335x TRM)
- Public ROM Code CRC (0x20020): 由0x20000-0x2BFFF計算得出的四個位元組CRC值。
- Dead loops (0x20080-0x200FF): 該區段定義預設的exception handlers,其預設handlers都是執行while(1)迴圈,程式設計者可以定義相同名字的exception handler,如此便能覆蓋 (override)對應之預設exception handlers。可參考[mini-arm-os](https://github.com/jserv/mini-arm-os/blob/master/05-TimerInterrupt/startup.c#L63)與[freertos](https://github.com/embedded2015/freertos-basic/blob/master/freertos/libraries/CMSIS/CM3/DeviceSupport/ST/STM32F10x/startup/gcc_ride7/startup_stm32f10x_md.s#L124)程式碼,以便了解其設計概念。
- Code (started from 0x20100): ROM程式碼
- ROM Version (0x2BFFC-0x2BFFF): ROM Code Version

圖3 ROM Memory Map (page 4098 in AM335x TRM)
VMM (Virtual Machine Module) and vbus
--------------------------------------------
Introduction to VMM
--------------------------------------------
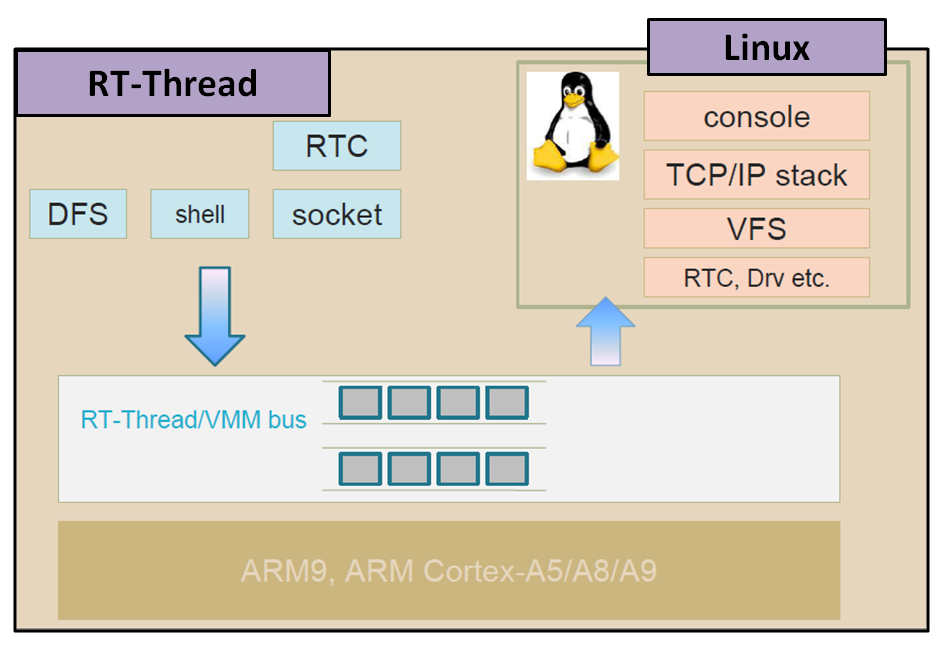
VMM模組可同時運行Linux與RT-Thread,如圖五所示。VMM以半虛擬化方式 (para-virtualization)運行另一個OS。
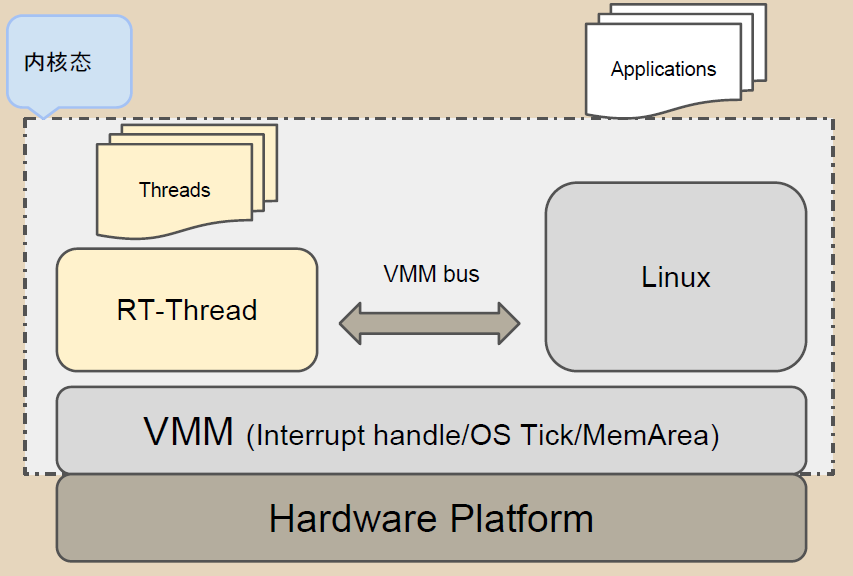
圖五、VMM/vbus Framework
三個元件需要用來實現同時運行RT-Thread與Linux,如下所述:
1. Linux VMM Kernel Patches: RT-Thread開發者發佈[兩個Kernel Patches ](https://github.com/AdrianHuang/rt-thread-for-vmm/tree/master/components/vmm/linux_patch-v3.8)支援多個作業系統同時運行。
2. Linux VMM Kernel Module (rtvmm.ko): 此模組用來載入RT-Thread Binary File。
3. RT-Thread Binary File (rtthread.bin): RT-Thread作業系統二進制檔。
Running VMM on QEMU (target machine: realview-pb-a8)
----------------------------------------------------
[編譯與執行]
[rt-thread-vmm-builder ](https://github.com/AdrianHuang/rt-thread-vmm-builder)自動地將Linux VMM Kernel Patches、Linux VMM Kernel Module與RT-Thread Binary File編譯,並產生kernel image (zImage)與root file system。參考底下步驟 (同時可參考[rt-thread-vmm-builder README檔 ](https://github.com/AdrianHuang/rt-thread-vmm-builder)建構環境及相關Toolchain):
<<<<<<< edited
[rt-thread-vmm-builder](https://github.com/AdrianHuang/rt-thread-vmm-builder)自動地將Linux VMM Kernel Patches、Linux VMM Kernel Module與RT-Thread Binary File編譯,並產生kernel image (zImage)與root file system。參考底下步驟 (同時可參考[rt-thread-vmm-builder](https://github.com/AdrianHuang/rt-thread-vmm-builder) 建構環境及相關Toolchain):
<<<<<<< edited
=======
=======
>>>>>>> 5abe2f7b1dd3e609ac546aec5d2b8557799e12cb
>>>>>>> ac253c721771197ef88dc6de4dacf55ab6af283e
```
git clone https://github.com/AdrianHuang/rt-thread-vmm-builder.git
cd rt-thread-vmm-builder/
cd rt-thread-vmm-builder
make
make qemu
```
執行'make qemu'後, 會啟動qemu模擬器,Linux console與RT-Thread console切換鍵如下:
<<<<<<< edited
- Linux Console -> Ctrl+Alt+F3
- RT-Thread Console -> Ctrl+Alt+F4
=======
<<<<<<< edited
* Linux Console -> Ctrl+Alt+F3
* RT-Thread Console -> Ctrl+Alt+F4
=======
- Linux Console -> Ctrl+Alt+F3
- RT-Thread Console -> Ctrl+Alt+F4
>>>>>>> 5abe2f7b1dd3e609ac546aec5d2b8557799e12cb
>>>>>>> ac253c721771197ef88dc6de4dacf55ab6af283e
[執行畫面]
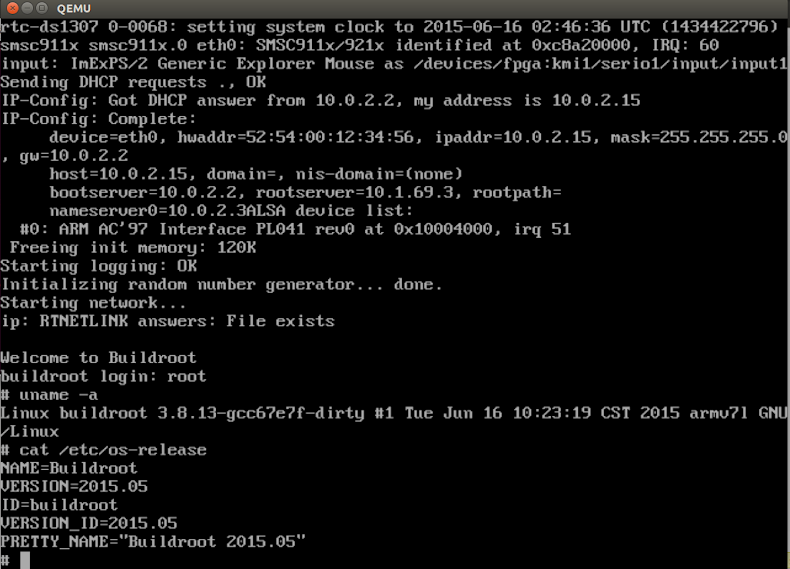
圖六、執行'make qemu'並按Ctrl+Alt+F3進入Linux Console
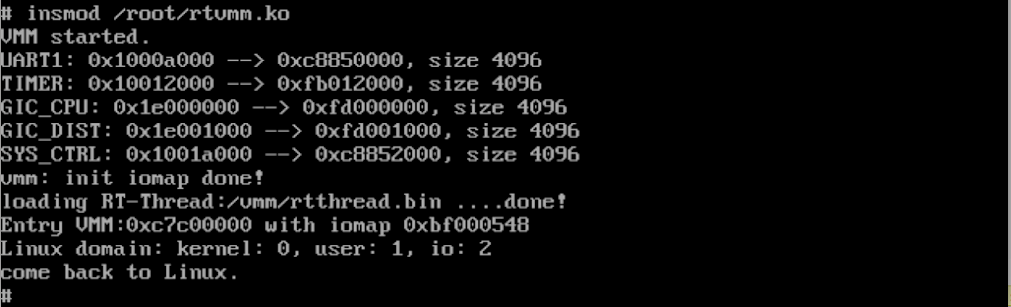
圖七、載入rtvmm.ko模組

圖八、Ctrl+Alt+F4進入RT-Thread Console
Running VMM on BeagleBone Black
--------------------------------------------
參考[Building BBB Kernel - Downloading and building the Linux Kernel ](http://elinux.org/Building_BBB_Kernel#Downloading_and_building_the_Linux_Kernel),嘗試將Linux VMM Kernel Patches加進該kernel (v3.8.13)。然而,遇到底下幾個問題:
**編譯錯誤**: 執行`make ARCH=arm CROSS_COMPILE=arm-linux-gnueabi- uImage dtbs`命令後,出現底下編譯錯誤:
```
$ make ARCH=arm CROSS_COMPILE=arm-linux-gnueabi- uImage dtbs
...
...
CC arch/arm/vmm/am33xx/virq.o
LD arch/arm/vmm/built-in.o
CC arch/arm/kernel/elf.o
AS arch/arm/kernel/entry-armv.o
arch/arm/kernel/entry-armv.S: Assembler messages:
arch/arm/kernel/entry-armv.S:257: Error: Thumb load/store multiple does not support {reglist}^ -- `ldmia sp,{r0-pc}^`
make[1]: *** [arch/arm/kernel/entry-armv.o] Error 1
make: *** [arch/arm/kernel] Error 2
```
其中{reglist}^的"^",代表該指令執行於ARM state,詳情參考[ARM官網 ](http://infocenter.arm.com/help/index.jsp?topic=/com.arm.doc.dui0204j/Cihcadda.html)。底下兩個方法避免此編譯錯誤:
[編譯錯誤解決方法 - 加入ARM()巨集]
<<<<<<< edited
=======
>>>>>>> 5abe2f7b1dd3e609ac546aec5d2b8557799e12cb
```
#if defined(CONFIG_CPU_V6)
ldr r0, [sp]
strex r1, r2, [sp] @ clear the exclusive monitor
ldmib sp, {r1 - pc}^ @ load r1 - pc, cpsr
#elif defined(CONFIG_CPU_32v6K)
clrex @ clear the exclusive monitor
ARM( ldmia sp, {r0 - pc}^ ) @ load r0 - pc, cpsr 原始程式碼沒加ARM巨集,加入該巨集可以避免編譯錯誤
#else
ldmia sp, {r0 - pc}^ @ load r0 - pc, cpsr
#endif
```
編譯成功後,開進Linux kernel (uImage),發現OS會一直停在**Uncompressing Linux... done, booting the kernel.**,如下圖所示:
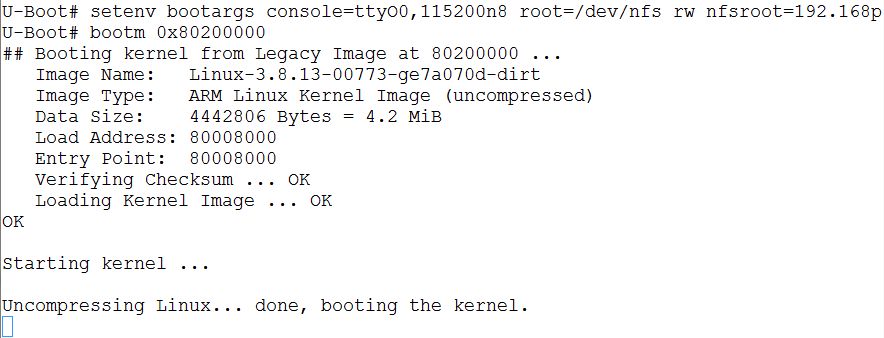
追蹤核心原始碼[arch/arm/include/asm/unified.h ](http://lxr.free-electrons.com/source/arch/arm/include/asm/unified.h#L44),發現開啟CONFIG_THUMB2_KERNEL選項,ARM()巨集是空巨集,導致核心卡住。故關閉CONFIG_THUMB2_KERNEL (注意: ARM()巨集不用加到arch/arm/kernel/entry-armv.S)。
[編譯錯誤解決方法 - 關閉CONFIG_THUMB2_KERNEL選項]
關閉CONFIG_THUMB2_KERNEL選項,編譯能成功且可以順利開進核心。然而,載入rtvmm.ko模組會發生錯誤,如下圖所示:

成功開進VMM支援的核心
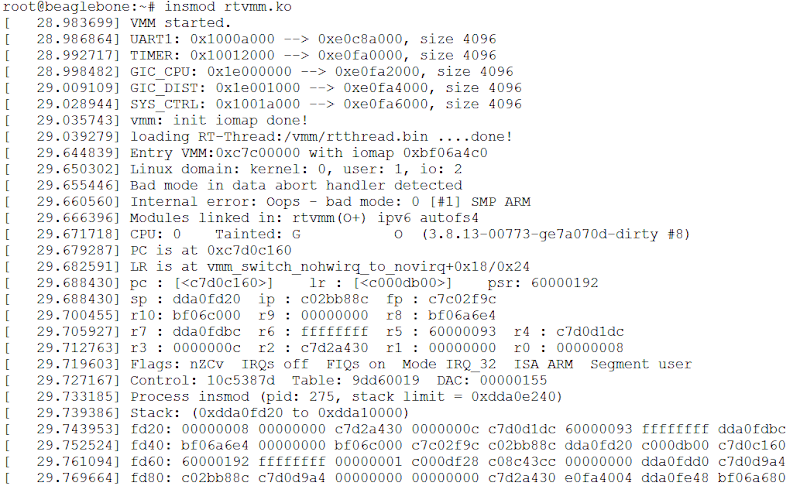
載入rtvmm.ko出錯畫面
追縱RT-thread程式後,發現沒有支援BeagleBone Black的VMM功能 (詳見: [libcpu/arm/am335x ](https://github.com/RT-Thread/rt-thread/tree/master/libcpu/arm/am335x)。目前正在參考[Realview Cortex A8 VMM的支援 ](https://github.com/RT-Thread/rt-thread/tree/master/libcpu/arm/realview-a8-vmm),以便在BeagleBone Black支援VMM。
Introduction to vbus
--------------------------------------------
VMM Bus (vbus)用來讓RT-Thread與Linux相互通訊,且可以讓OS之間的功能共享,如圖九所示。
圖九、VMM Bus
OS之間的功能共享 - Finsh
圖十把finsh shell指向一個pipe設備,透過該設備把資料寫到ring buffer,並產生一個中斷用以通知另一個OS。另一個OS接收到該中斷後,便從ring buffer中,把資料讀取出來。
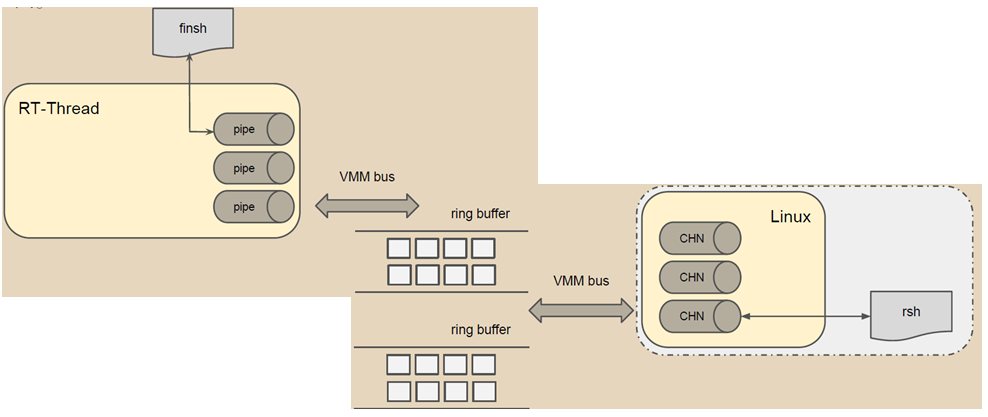
圖十、Finsh/rsh共享
* Two threads:
- Thread: "vbusout" (Priority: _BUS_OUT_THRD_PRIO = 8)
- Thread: "vbusin" (Priority: _BUS_OUT_THRD_PRIO+1)
* [Source Code]
- components/vbus/
- components/drivers/src/pipe.c
- components/drivers/src/ringbuffer.c
* 支援硬體
- [LPC4357] Cortex-M0 & Cortex-M4
- bsp/lpc43xx/M0/applications/vbus_drv.c
- bsp/lpc43xx/M4/applications/vbus_drv.c
* RTMux
- 支援硬體
- [Realview] Cortex-A8
- [Beagle Board Black] AM33x-based Processor (Cortex-A8)
<Under Construction...>
記憶體管理
--------------------------------------------
MMU Configuration in RT-Thread
--------------------------------------------
MRC/MCR Instruction
MMU設定跟Coprocessor 15有關,下圖為Coprocessor 15暫存器配置圖 。
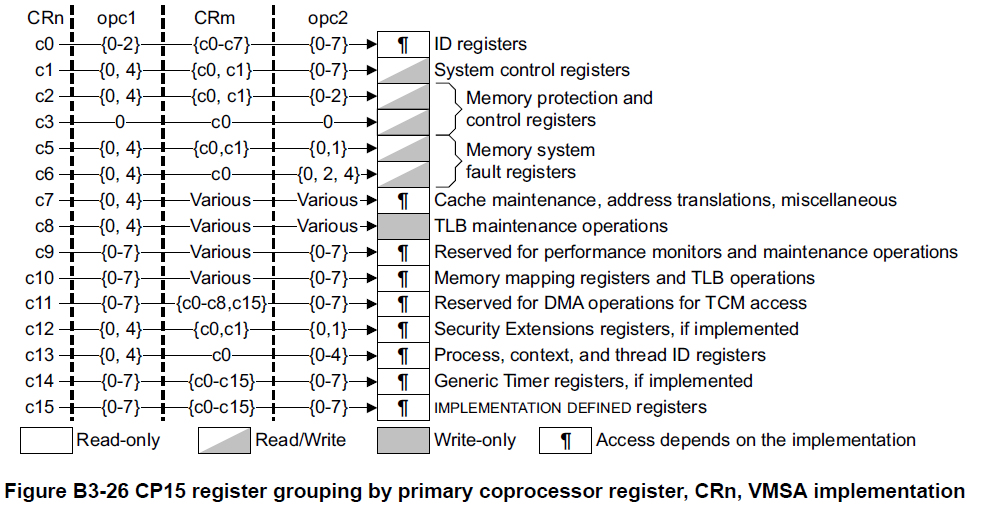
圖四 VMSA: Virtual Memory System Architecture
MRC: Move to ARM register from coprocessor
- MRC coproc, opcode1, Rd, CRn, CRm{, opcode2}, where Rd is ARM source register
MCR: Move to coprocessor from ARM registers
- MCR coproc, opcode1, Rd, CRn, CRm{, opcode2}, where Rd is ARM source register
MMU Initialization in RT-Thread
Disable Data Cache
mrc p15, 0, r0, c1, c0, 0 /* Read System Control Register */

RT-Thread 的記憶體管理分成幾個部份:
- 固定大小/數量 memory pool (mempool.c)
**rtconfig.h 設定及程式介面**
固定區塊 memory pool:
- 啟用 RT\_USING\_MEMPOOL,記憶體需要事先手動分配 rt\_mempool。
動態:
- 啟用 RT\_USING\_HEAP,可選擇 memheap(RT\_USING\_MEMHEAP +
RT\_USING\_MEMHEAP\_AS\_HEAP) ***或*** slab( RT\_USING\_SLAB ),包含
rt\_malloc, rt\_page\_alloc 等介面。
另外 memheap 可以獨立使用,不要打開 RT\_USING\_MEMHEAP\_AS\_HEAP 即可。
Memory Pool (mempool.c)
-----------------------
RT-Thread 中的 Memory Pool
的記憶體來源可以是原有的全域變數,也可以是動態
分配來的空間(heap/slab)。
Memory pool 提供的是一個固定 block 大小及數量的記憶體空間管理,只能取得
固定的 buffer 大小。裏面目前空閒的 block 以 linked list 型態串接,稱為
**free list**\ 。
因為大小是固定大小,因此只要還有記憶體,分配的時間便是一個常數,若沒有空間,
則依據要求記憶體的參數決定要讓該 task suspend 或是直接回傳分配失敗。
**API**
初始化 (& 動態分配 memory pool 空間):
- rt\_mp\_init(); // 把現有的記憶體空間建成 rt\_mempool
- rt\_mp\_create() // 使用 heap 做出新的 rt\_mempool。
解構 / 解構加釋放:
- rt\_mp\_detach() // 僅解構
- rt\_mp\_free() // 從 heap 來的物件需要再做釋放。
使用 memory pool 分配固定大小的記憶體:
- rt\_mp\_alloc()
- rt\_mp\_free()
若 block\_free\_count 不為 0,則將 block\_list 指向 list
中下一個並回傳,而 block 中的前 4 個 byte 則當作指標指回
mp\_pool,以便在需要歸還時能夠找到對應的 rt\_mempool。
第二個參數是等待時間,若沒有可用的記憶體會讓 task 進入 suspend
狀態,直到時間到或是有可用記憶體為止。
- 一個全新的 rt\_mempool 示意圖,其中左邊的 block
可以是靜態記憶體(rt\_mp\_init)、或是從 heap 中拿取(rt\_mp\_create),
.. figure:: https://hackpad-attachments.s3.amazonaws.com/rt-thread.hackpad.com_PpK8VwT14da_p.378129_1433766635817_Reg1-6.png
:alt:
- 假設經過幾次 allocate / free 後,中間兩個 block 目前被程式使用中。
- 因為還有空閒物件,thread\_objects 為空。
.. figure:: https://hackpad-attachments.s3.amazonaws.com/rt-thread.hackpad.com_PpK8VwT14da_p.378129_1433766694494_Reg1-6.png
:alt:
**對 Real-time 能力的影響**
allocate / deallocate 的過程中會關閉 interrupt,因此有可能會造成
jitter,另外當記憶體不足時會使得 task 被暫停。
Heap
----
較簡單的記憶體管理器,使用 free list 串接可用記憶體,並以 first fit
策略尋找,為了減輕碎片化的問題,加上了最小區塊的限制。
```
#define RT\_MEMHEAP\_MINIALLOC 12
```
Slab Allocator
--------------
slab 的其中一個作法是藉由減少物件的 construct 成本以增進效率,而又因為
slab
常用在經常進行 allocate 和 free 的物件,因此也有cache 上的優勢。
**介面**
假設原本產生新的動態物件的流程如下:
```
obj = allocate(sizeOfObject);
construct(obj);
```
使用完畢後的清理:
```
destruct(obj);
deallocate(obj);
```
Slab Allocator 的作法則是這樣:
```
if(there's an object in cache){
take(); // already constructed
}else{
allocate();
construct();
}
```
至於清理則是:
```
return to cache; // not destructed
```
另外在記憶體不足時可以選擇將 cache 內的物件 destruct 之後釋放
**全域 vs. 特定物件**
Object caching 的機制可以套用到個別物件的
allocater,也可以針對所有種類的
物件, paper 中提到實作全域配置器的好處:
1. 因為記憶體統一管理,可以釋放部份物件空間給予其他物件使用
2. 單層的配置器資料結構較多層配置器簡單,較容易除錯
3. 避免多種相同功能的程式增加 code size
**資料結構**
一個 "slab" 是一個 page 大小,在這裡指的是 4k:(在 RT-Thread 中則是
slab\_zone)
.. figure:: https://hackpad-attachments.s3.amazonaws.com/rt-thread.hackpad.com_PpK8VwT14da_p.378129_1434029743241_Reg1-6.png
:alt:
其中若 buf 處於 free 的狀態,其最後面一個 word 的空間用來放置指標指向
free-
list 的下個物件(稱為bufctl),若 buf 裏面存的是一個 constructed
object,則
allocator 會多分配一個 word,避免破壞物件狀態。
若是較大的物件(比方說大於一個page)則不能直接使用上面的資料結構,因為沒辦法從
buffer 算出所屬的 slab 的位址,且空間效率降低(slab
中容易保留很大的空間但又
不足以放下另一個物件),因此在較大的物件要使用不同的資料結構,另外分配記憶體
,由物件本身管理 slab, bufctl,並且加上一個 hash table 來做
buffer-to-bufctl
的轉換。
每個不同的物件擁有一個 cache,包含一些由雙向 linked list 串起來的
slabs,
全部都被使用的 slab 在首,部份使用在中間,全空在最後(最多一個)。
**Allocate / Free 操作**
Free 的時候因為是 page aligned,因此可以算出 slab 的位址,將要 free
的物件
接回 slab 中的 buf free-list 即可。
由於 slabs free-list 有經過排序,當一個 slab
全空時會放回最後,當要再次進行
allocate 時避免從全空的 slab 中取用記憶體,當沒有新的 page
時有機會可以歸還
回系統,並增加使用中記憶體密集度,使 cache hit rate 提升。
當系統記憶體不足需要回收 page 時,allocator
在釋放時會檢查最近被使用的時間,
避免將常用記憶體歸還造成 thrashing 問題(類似於磁碟不停 swapping
的效應)。
**Slab allocator 在 Cache Utilization 上的優勢**
這裡提到一個「Buffer Address
Distribution」的概念,要調整效能首先要先知道
處理器 cache 的架構及大小等資訊。
am3358(Cortex-A8):
- L1 Cache(I-cache/D-cache, VIPT)
- 4-way set associative
- 16 word line
- 128 bit interface(16 byte)
- 32KB
- 64 Byte line length
Q: What does line length mean?
- [ ](http://infocenter.arm.com/help/index.jsp?topic=/com.arm.doc.ddi0198e/Cheeecjc.html)_\ http://infocenter.arm.com/help/index.jsp?topic=/com.arm.doc.ddi0198e/Cheeecjc.html
.. figure:: https://hackpad-attachments.s3.amazonaws.com/rt-thread.hackpad.com_PpK8VwT14da_p.378129_1433737577888_Reg1-6.png
:alt:
|image0|
.. raw:: html
<li>
**硬體上關注的點**
.. raw:: html
</li>
- cache 不同的架構:direct mapping(1-way)、n-way/fully associative
- Set associative 意味著同一個位址的資料在 cache
中有幾個位置可以選擇,接近 fully-associate 的 cache 就沒必要進行
coloring。
- 每個 word line 的大小,決定 coloring 的作法。
.. raw:: html
<li>
**軟體上關注的點**
.. raw:: html
</li>
- 物件的記憶體起點(是否對應到 bus 起點)
- 物件內部的 hot data 分佈
- allocate / free 物件的 pattern
.. raw:: html
<li>
**作法**
.. raw:: html
</li>
1. 在 slab 中並不使用 2 的冪次方作為 buffer 邊界
在於\ ***非*** fully-associative 的 cache 架構上佔優勢:
若一個常用物件總是對齊某個 2 的冪次方邊界,因為在 cache 中位置衝突,會
使得 cache 經常被換出而降低效能,避開對齊使得每個 buffer
比較不會搶同一條
cache line。
2. Slab Coloring: 在一個 slab 開頭的邊界加上 offset(color)
目的是使不同的 slab 起點的物件不會佔用同樣的 cache line。
**RT-Thread 的實作**
在 RT-Thread 省去了 slab 的物件建構及解構過程,只使用他的 memory pool
實作。
*初始化*
首先是 page 的分配,在系統起始時將 heap 範圍中的 page 串入
rt\_page\_list (透過 rt\_page\_free)。
*Zone size / Zone limit 計算*
```
#define ZALLOC\_ZONE\_LIMIT (16 \* 1024)
#define ZALLOC\_MIN\_ZONE\_SIZE (32 \* 1024)
#define ZALLOC\_MAX\_ZONE\_SIZE (128 \* 1024)
#define RT\_MM\_PAGE\_SIZE 4096 // include/rtdef.h
```
MIN < zone\_size < MAX or limsize / 1k
zoom\_limit = min( zone\_size / 4 , ZONE\_LIMIT
*struct memusage*
- rt\_uint32\_t type:2
- rt\_uint32\_t size:30
*處理記憶體要求*
分成兩種 case:
- 大於等於 zone\_limit:使用 rt\_page\_alloc 直接取得整塊記憶體。
- 小於 zone\_limit:
- request size -> buffer size \| buffer index(\ ``zoneindex``\ 回傳值)
```
< 128 -> 補到 8 byte 倍數 | 0 ~ 15 (size/8 - 1)
< 256 -> 補到 16 byte 倍數 | 16 ~ 23 (size/8 - 1 + 8) <- 128 / 16 = 8
< 512 -> 補到 32 byte 倍數 | 24 ~ 31
< 1024 -> 補到 64 byte 倍數 | 32 ~ 39
< 2048 -> 補到 128 byte 倍數 | 40 ~ 47
< 4096 -> 補到 256 byte 倍數 | 48 ~ 55
< 8192 -> 補到 512 byte 倍數 | 56 ~ 63
< 16384 -> 補到 1024 byte 倍數 | 64 ~ 72
```
.. figure:: https://hackpad-attachments.s3.amazonaws.com/rt-thread.hackpad.com_PpK8VwT14da_p.378129_1434740946804_slab.png
:alt:
**總結**
RT-Thread 中的實作目前看起來跟 mempool 高度相似,並沒有實作 paper 中的
coloring (也許是參數不足?),以及 hot cache 的 queue,跟 mempool
不同的地方在於預先為各種大小分配好的 zones(slabs),自動 allocate 新的
page 等機制。
在程式碼註解中提到這個 slab allocator 的實作是 per-cpu,不使用
mutex/semaphore,而是透過 critical section(資料需要保護的時間很短)。
另外他提到了不同 cpu 間的 free 要透過 asynchronous IPIs(inter-processors
interrupts) 進行,不過程式碼中並沒有看到相關實作,註解中也提到 cpu 間的
Balancing(for what?) 也還沒實作,或是移植時被去除了。
**Hook**
RT-Thread 在記憶體 alloc / free 結束時,會呼叫使用者指定的
callback,使用:
rt\_malloc\_sethook(func);
rt\_free\_sethook(func);
參考影片
--------
[ ](https://www.youtube.com/watch?v=h0VMLXavx30)_\ https://www.youtube.com/watch?v=h0VMLXavx30
解說了 slob, slab, slub 三種 "slab" 的歷史與實作。
影片中 "Slab" 代表三種意思:Allocator 類別、Allocator
類別中的一種、一個被管理的 page(或是大型物件)。
裏面提到了 slab 的一些特性:
- 預先消耗的記憶體
- 紀錄 hot memory
- 物件為基礎
- 需要定時掃描
- 比較不適用於多核心環境(每個核心要管理自己的 cache)
部份特性在 RT-Thread 沒有實作。
.. |image
Device File System
------------------
RTT的應用層接口實作
------------------
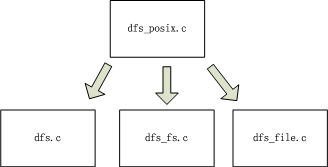
提供API給應用層開發者使用,源碼在.\components\dfs\src\dfs_posix.c, 提供的API包括:
chdir、close 、closedir、fstat、getcwd、lseek、mkdir、open、opendir、read、readdir、rename、rewinddir、rmdir、seekdir、stat、statfs、telldir、unlink、write
dfs_posix.c會調用dfs.c,dfs_fs,c,dfs_file.c中的一些函數:
DFS框架的組成內容
------------------
* filesystem_operation_table:每一個table表示一個FS對應的一套操作函數及相關屬性,不管是什麼FS其操作函數的形式是一致的
<<<<<<< edited
=======
>>>>>>> 5abe2f7b1dd3e609ac546aec5d2b8557799e12cb
```
/* File system operations struct */
struct dfs_filesystem_operation
{
char *name; //FS的名稱
rt_uint32_t flags; //操作標識
/* mount and unmount file system */
int (*mount) (struct dfs_filesystem *fs, unsigned long rwflag, const void *data); //掛載
int (*unmount) (struct dfs_filesystem *fs); //取消掛載
/* make a file system */
int (*mkfs) (rt_device_t devid); //創建一個FS文件
int (*statfs) (struct dfs_filesystem *fs, struct statfs *buf); //獲得FS當前狀態信息
int (*open) (struct dfs_fd *fd); //打開
int (*close) (struct dfs_fd *fd); //關閉文件
int (*ioctl) (struct dfs_fd *fd, int cmd, void *args); //文件控制
int (*read) (struct dfs_fd *fd, void *buf, rt_size_t count); //讀文件
int (*write) (struct dfs_fd *fd, const void *buf, rt_size_t count); //寫文件写
int (*flush) (struct dfs_fd *fd); //將文件內容保存到設備上
int (*lseek) (struct dfs_fd *fd, rt_off_t offset); //文件內容定位
int (*getdents) (struct dfs_fd *fd, struct dirent *dirp, rt_uint32_t count); //獲取目錄條目
int (*unlink) (struct dfs_filesystem *fs, const char *pathname); //從FS中移出一個目錄
int (*stat) (struct dfs_filesystem *fs, const char *filename, struct stat *buf); //獲得文件狀態信息
int (*rename) (struct dfs_filesystem *fs, const char *oldpath, const char *newpath); //文件重命名
};
```
* filesystem_table:此table記錄已掛載的FS,每一個table表示掛載的的一个FS
<<<<<<< edited
=======
>>>>>>> 5abe2f7b1dd3e609ac546aec5d2b8557799e12cb
```
/* Mounted file system */
struct dfs_filesystem
{
rt_device_t dev_id; //此FS對應的ID
char *path; //此FS的掛載點
const struct dfs_filesystem_operation *ops; //此FS對應的操作接口集,指向filesystem_operation_table對應的表项
void *data; //FS的數據
};
fd_table:記錄目前打開的文件集合,每一個table表示一個打開的文件句柄
/* file descriptor */
#define DFS_FD_MAGIC 0xfdfd
struct dfs_fd
{
rt_uint16_t magic; //文件描述魔術
rt_uint16_t type; //文件類型
char *path; //相對於掛載點的路徑
int ref_count; //目前被關聯的次數
struct dfs_filesystem *fs; //對應的FS
rt_uint32_t flags; //標識
rt_size_t size; //文件大小
rt_off_t pos; //當前文件位置
void *data;
};
```
DFS框架的組成內容
------------------
* DFS架構初始化(最頂層)
<<<<<<< edited
=======
>>>>>>> 5abe2f7b1dd3e609ac546aec5d2b8557799e12cb
```
void dfs_init(void)
{
//清空filesystem_operation_table、filesystem_table、fd_table
rt_memset((void *)filesystem_operation_table, 0, sizeof(filesystem_operation_table));
rt_memset(filesystem_table, 0, sizeof(filesystem_table));
rt_memset(fd_table, 0, sizeof(fd_table));
/* create device filesystem lock */
rt_mutex_init(&fslock, "fslock", RT_IPC_FLAG_FIFO); //FS MUTEX初始化
#ifdef DFS_USING_WORKDIR
/* set current working directory */
rt_memset(working_directory, 0, sizeof(working_directory)); //工作路徑初始化
working_directory[0] = '/';
#endif
}
```
* 具體的FS初始化(中間層),以ELMFAT文件系統爲例:
<<<<<<< edited
=======
>>>>>>> 5abe2f7b1dd3e609ac546aec5d2b8557799e12cb
```
int elm_init(void)
{
/* register fatfs file system */
dfs_register(&dfs_elm); //註冊elmfat文件系統
return 0;
}
int dfs_register(const struct dfs_filesystem_operation *ops)
{
int index, result;
int free_index;
result = 0;
free_index = DFS_FILESYSTEM_TYPES_MAX;
//首先獲得文件操作權限
dfs_lock();
//檢查該FS是否註冊過
for (index = 0; index < DFS_FILESYSTEM_TYPES_MAX; index++)
{
if (filesystem_operation_table[index] == RT_NULL)
{
/* find out an empty filesystem type entry */
if (free_index == DFS_FILESYSTEM_TYPES_MAX) //記錄第一個空閒位置
free_index = index;
}
else if (strcmp(filesystem_operation_table[index]->name, ops->name) == 0) //若已註冊,则返回錯誤
{
result = -1;
goto err;
}
}
/* filesystem type table full */
if (free_index == DFS_FILESYSTEM_TYPES_MAX) //若FS已滿,則返回錯誤
{
result = -1;
goto err;
}
/* save the filesystem's operations */
filesystem_operation_table[free_index] = ops; //將目前操作集合記錄到空閒位置
err:
dfs_unlock(); //釋放FS操作權限
return result;
}
```
* FS對應的具體設備驅動初始化(底層)
應建立起對應的:
rt_sd_init/open/clode/read/write/control,開始可以是空函數(返回類型是rt_err_t的可默認返回RT_EOK)
* 掛載FS(將各層具體關聯起來)
<<<<<<< edited
=======
>>>>>>> 5abe2f7b1dd3e609ac546aec5d2b8557799e12cb
```
/* mount SPI flash as root directory */
if (dfs_mount("flash0", "/", "elm", 0, 0) == 0) //掛載名爲elm的FS,該FS對應的設備名为flash0,掛載點爲/
{
rt_kprintf("flash0 mount to /.\n");
}
else
{
rt_kprintf("flash0 mount to / failed.\n");
}
```
參考資料
--------------------------------------------
* Beaglebone
- [Rev. changes](http://elinux.org/Beagleboard:BeagleBoneBlack#Revision_C_.28Production_Version.29)
- [Schematic](http://beagleboard.org/static/beaglebone/latest/Docs/Hardware/BONE_SCH.pdf)
- [System Reference Manual](http://docs-asia.electrocomponents.com/webdocs/12d7/0900766b812d788b.pdf)
* AM335x (3358) TRM, Datasheet
- [TRM](https://drive.google.com/open?id=0B90H2V1uw2FnVmNndG5jV3V5N2M&authuser=0)
- [Datasheet](https://drive.google.com/open?id=0B90H2V1uw2FnbzFDZTNpRC1jOGc&authuser=0)
- [Boot process](http://processors.wiki.ti.com/index.php/AM335x_U-Boot_User%27s_Guide#U-Boot)
* ARM Cortex-A8
- [TRM](https://drive.google.com/open?id=0B90H2V1uw2FnRnJOSlpzTm4yWFU&authuser=0)
- ISA: [①](https://drive.google.com/open?id=0B90H2V1uw2FnUEZzWFpmR3JKa1U&authuser=0) [②](http://people.cs.nctu.edu.tw/~chenwj/dokuwiki/doku.php?id=arm)
- Bus:
- [AMBA](https://drive.google.com/open?id=0B90H2V1uw2FnRHpIWGJLaUUwZzA&authuser=0)
- [APB](https://drive.google.com/open?id=0B90H2V1uw2FnUEZzWFpmR3JKa1U&authuser=0)
- [AXI](https://drive.google.com/open?id=0B90H2V1uw2FnSVBERUdFUFlsZkE&authuser=0)
* POSIX
- [The Open Group Base Specifications Issue 7](http://pubs.opengroup.org/onlinepubs/9699919799//)
- [Open POSIX Test Suite](http://posixtest.sourceforge.net/)
* EMMC
- [Kingston KE4CN2H5A](http://uk.rs-online.com/web/p/flash-memory-chips/7852322P/)
