Lab39: Cross-Development (2015q1 Week #3)
預期目標
- 體驗一個具體而微的 MCU 程式開發過程,使用 GNU Toolchain
- 藉由 QEMU 模擬環境,嘗試控制週邊 (STM32 USART) 並觀察其行為
- 接觸 FreeRTOS
預先準備
- 安裝 Ubuntu Linux,建議版本為 14.10
- 安裝必要的套件,如下:
sudo apt-get install build-essential git zlib1g-dev libsdl1.2-dev libglib2.0-dev "automake*" "autoconf*" libtool libpixman-1-dev- 若 Ubuntu 使用 64bit 版本 ,請額外安裝 lib32gcc1 之套件
sudo apt-get install lib32gcc1 lib32ncurses5- 取得 GNU Toolchain: GNU Tools for ARM Embedded Processors ,或用 apt-get 取得,操作如下
sudo apt-get install gcc-arm-none-eabi libnewlib-arm-none-eabiSTM32 Overview
- Powerful but Cheap
- Wireless Connectivity
- Computing/Prototyping
- One for most use cases
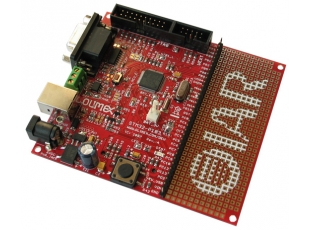
- STM32-P103
- MCU: STM32F103RBT6 ARM Cortex-M3, up to 72MHz operation
- 128K Bytes Program Flash, 20K Bytes RAM
- USB, CAN, x2 I2C, x2 ADC 12 bit, x3 UART, x2 SPI, x3 TIMERS
STM32 on QEMU 環境建立與測試
    mkdir -p workspace
    cd workspace
    git clone git://github.com/beckus/stm32_p103_demos.git || git clone https://github.com/beckus/stm32_p103_demos.git
    git clone git://github.com/beckus/qemu_stm32.git || git clone https://github.com/beckus/qemu_stm32.git

    cd qemu_stm32
    git submodule update --init dtc || sudo apt-get install libfdt-dev
    ./configure --disable-werror --enable-debug \
        --target-list="arm-softmmu" \
        --extra-cflags=-DSTM32_UART_NO_BAUD_DELAY \
        --extra-cflags=-DSTM32_UART_ENABLE_OVERRUN \
        --disable-gtk
    make
    cd ../stm32_p103_demos
    make all
    make blink_flash_QEMURUN
    make button_QEMURUN
    make uart_echo_QEMURUN
小提醒
如果用 git clone qemu_stm32 並且 make 完後,在 uart_echo 這個範例中 serial0 沒有回應的話,請用 qemu_stm32 release v0.13 來重新編譯一次。
若 Linux 環境中預設的 python 版本是 python3,可能會無法configure,這時就可用python virtualenv 解決:
- 先安裝 python-virtualenv, python2-virtualenv
  $ virtualenv2.7 env
  $ source env/bin/activate
QEMU monitor 中按下 Ctrl-Alt-2 可切換到 serial0,即可作 UART 輸出/輸入測試,而按下 Ctrl-Alt-1 可切回 QEMU monitor
詳情可參閱 stm32_p103_demos 目錄的 README 檔案
Ubuntu Linux 的「下載」目錄名稱就叫做「下載」,建議可建立 symbolic link 到 “Downloads” 目錄,如下:
ln -s ~/下載 ~/Downloads
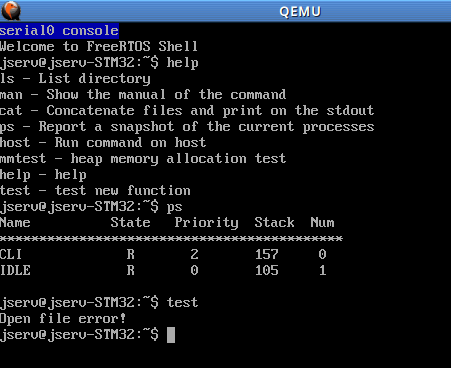
FreeRTOS
- 已整合檔案系統到 FreeRTOS 中,並可在 UART 顯示檔案系統 (romfs) 中的內容 (但是目前版本不能正確運作)
- 測試方式
cd ~/workspacegit clone git@github.com:embedded2015/freertos-basic.git或者:
git clone https://github.com/embedded2015/freertos-basic.gitcd freertos-basicmakemake qemu- 輸入 “help” 可見已實作的 shell command
- ps
- mmtest
- host
- 輸入
host ls並觀察 host 端終端機的畫面
- 輸入
ARM Semihost
- 使用 ARM 所開發的目標系統 (target system),不一定會提供所有的輸入/輸出設備。因此 ARM 設計了 semihost 這種機制,讓運行 ARM debugger 的主機可以與目標系統進行 I/O 溝通,以利產品開發
- http://albert-oma.blogspot.tw/2012/04/semihosting.html
- Semihost 的實作是透過使用定義好的軟體中斷 (SVCs),使程式在執行過程中產生中斷。一旦目標系統上的程式呼叫到對應的指令 (semihosting call),便產生軟體中斷,接著 Debug Agent 就會負責處理此中斷,進行與主機的溝通
- http://infocenter.arm.com/help/index.jsp?topic=/com.arm.doc.dui0205g/Bgbjhiea.html
- FreeRTOS extensions: https://github.com/hugovincent/mbed-freertos
- lib/semifs.c
- mbed (mbed.org) target supports semihosted local filesystem, accessible via the mbed USB interface. Should also work with semihosting-compatible debuggers.
- QEMU ARM semihosting
- http://balau82.wordpress.com/2010/11/04/qemu-arm-semihosting/
參考執行畫面:
參考作業要求
- 修正和擴充
test,試著追加有用的功能,如計算質數或 Fibonacci 數,並且適度回報 - 建立新的 shell 指令,如
new,讓系統建立新的 FreeRTOS task,並確保ps可正確顯示新建立的 task- 思考:系統可允許多少個這樣的 task 呢?
- 在 FreeRTOS 中建立新的 task,定期將系統資訊 (參考 shell.c 的 ps_command 函式) 透過 ARM semihosting 存放到 host 端檔案系統的 sysinfo 檔案
挑戰題
- 修正原本檔案系統無法運作的狀況,使
ls和cat一類的指令得以使用 - 撰寫 romfs 的 test suite,可參考 zeke 的 kern/test/fs
- 模仿
mmtest指令,開發可以驗證 FreeRTOS task 建立和摧毀的指令,並且指出無止盡建立新的 task,究竟有什麼限制
繳交作業
- 截止日期:
- Mar 21, 2015 (含) 之前
- 更新開發過程到共筆網站: Lab 39 / 作業共筆,需要標注自己的 ID
- 將符合作業提案的程式碼,提交到自行 fork 的 repository: https://github.com/embedded2015/freertos-basic
- 注意: 要記得 fork freertos-basic
